


View Window has another menu with options for controlling
just that view. In this section, we will explore some of the features of the
View and Projections
menus associated with each View Window.
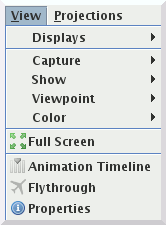
View Window also has a View
menu that lets you change the point of view, capture the state of
the display, and make other changes in the overall view.
View Window Properties dialog with the
View→Properties menu.
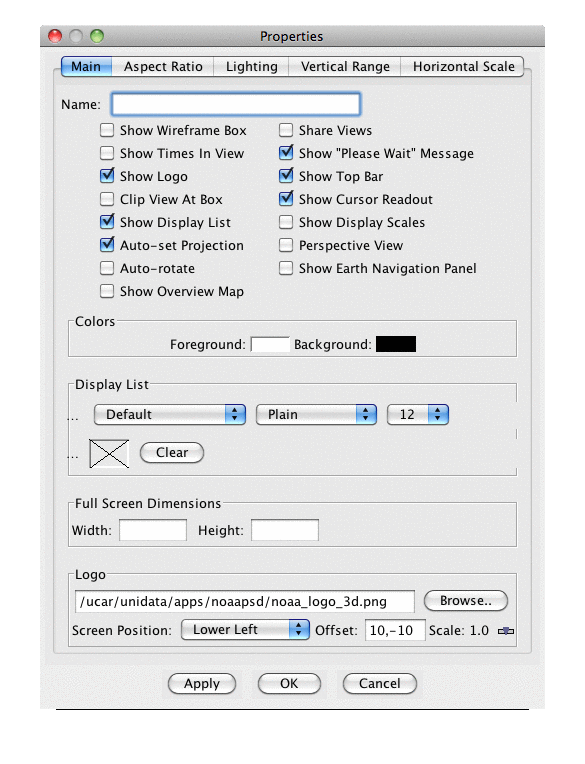
Show Wireframe Box item
to turn off the 3D box in the display then click the
Apply button. Check it
again to turn the box back on and click the
Apply button.Show Cursor Readout item
to turn off the lat/lon/alt readout at the bottom of the
View Window and click the
Apply button.Clip View At Box menu item
to turn off clipping of the map lines and other displays at
the 3D box and click Apply. Check it again to
turn on clipping.Show Times In Display item
to turn on the time label in the view window. Uncheck
the Show Display List item and
click Apply. The Display List is no longer
shown, but the time label is now shown. Note that the
time is also shown as part of the Display List for each
of the displays and in the Time Animation Widget.
Color widgets and selecting a new color.
After making your selection, click Apply.
View menus.
View→Show menu to see which of
the items we changed above are available. Use some
of these to change your display.View→Color menu to change the
foreground and background colors of the display. You
can select one of the pre-defined foreground/background
color pairs, or create your own. Select one of the
predefined options to change the display colors. Select
View→Color→White on black menu to return to
the system default.View→Full Screen menu to expand
the view to the full screen. Click the X to return to normal
screen mode.
Another useful menu item is the Viewpoint menu.
This menu can be used to control which side of the 3D box you are looking at.
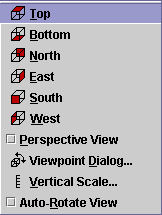
Top
through West instantly reset the
point of view to one of the orthogonal directions. The menu
icons show which side of the box will be displayed. Note that
Top is the same as the reset
command Ctrl-r which we used earlier. South menu then
rotate the box with the keyboard or mouse to see the orientation.Perspective View item toggles
between a parallel (unchecked) and perspective (checked)
view. Check the box and see what effect it has.Viewpoint toolbar:

Other Viewpoint menu items
Viewpoint Dialog... displays a dialog box for you to enter the azimuth and tilt of a desired point of view.
Vertical Scale...displays a dialog box to set the linear vertical
scaling between the top and bottom the wireframe box. The default
is 0 to 16 km. This can also be changed through the
Vertical Scale tab of the View Window Properties
dialog.
View Window's Projections menu
let you change and define the map projection.
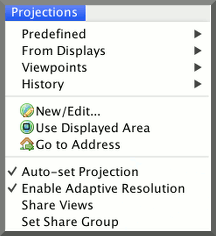
Map projections define the region of the earth that you are viewing. The IDV is configured with a set of pre-defined map projections. In a later exercise, you will learn how to create your own. In this exercise, we will learn how to change projections using the system set.
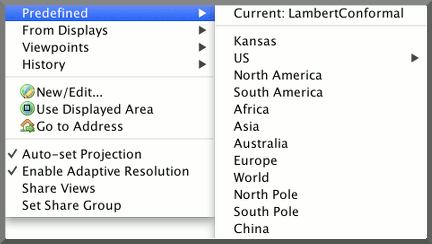
Projections→Predefined→US→CONUS menu item
to switch to the continental US projection.Maps→Projections→Predefined menuThe Projections→From Displays menu has a list of projections
from the data of any displays.
The Projections→History menu has a list of recently
used projections.
The Projections→New/Edit.. menu item is used
to bring up the Projection Manager
which is used to define projections. You will use this in a
later exercise to define your own projections.
Other Projections Menu Items
Auto-set Projection menu
item allows you to control whether the display projection is changed
when you load in new data.Enable Adaptive Resolution menu item allows the IDV
to calculate the resolution of the map view window, dynamically sets the
data sampling, and loads sufficient data to generate the image.Share Views menu item allows you to share
the maps and projections between different
View Windows.
File→New→View Window→Map Display→One Pane menu item
to bring up a new View Window.Projections→Predefined menu in each
View Window to change the
projections to be different in each display.Projections→Share Views item in
each View Window.View Window
by clicking the X in the upper right corner of the
window.